Eek, now what? Confessions of a new Cricut Maker Owner

So this happened!

20180504_101635_Film1.jpg

I have a new Cricut!  It’s been sitting on my desk in the box for the last week — yes, an entire week.  Why?  Because I have no freakin’ idea where to start and I’m a little paralyzed.  I’m seriously questioning yet another hobby, although I can totally justify that sewing/quilting and machine cutting are somewhat related — sort of, if I really try.

I’ve sent some time this week in a Facebook Cricut group, and watching videos from Auntie Tay and Lorrie Nunemaker on YouTube — thank you both if you see this.  I’m about ready to haul this sucker out and start.  I have two small projects to start with — a street sign and a small helmet sticker for MartMan — hopefully the rest will just come to me.  You know, if you build it ….

There are some bigger projects down the road, I hope.  I feel like a new parent.

Creativity, don’t fail me now.  Putting on my brave now.

Dresden Plate Clock

What time is it?

I knocked my sewing room atomic clock off the wall the other day and damaged the display, so I decided I needed a new clock. I searched Amazon, Etsy, and eBay for sewing-themed clocks and decor and found a lot of cute things, but nothing that spoke to me enough to buy. In my search, I ran across a few pictures of a handmade clock using a vintage quilt block design called the Dresden Plate, and I fell in love with it. The original purpose of a Dresden Plate quilt was to use the smallest fabric scraps so nothing went to waste, and this random piecework style seemed to suit my crafting and sewing style.

This is my version of the Dresden Plate clock.

20180407_211326_Film1-1.jpg

20180414_154555_Film1-1.jpg

Traditional Dresden Plates have 16 petals, but my first Dresden Plate blades were made using a template I accidentally found online at The Crafty Quilter that yielded 12 blades per Dresden, perfect for clock making. I chose a 12″ x 12″ x 1″ square artist’s canvas to mount my clock to, and found that a 5″ tall blade created a Dresden with a final diameter of 11-1/2″ including the center circle.

Here’s what you need to make your own:

  • A 12-blade Dresden Plate — quilted to a piece of coordinating fabric at least 14″ x 14″ or bigger so it wraps around the canvas frame to be secured in place on the back.
  • Batting — I used white fleece on this, since the fabric content really didn’t matter. The fleece was almost too bulky on the corners of the frame.
  • 12″ x 12″ artist’s stretched canvas — available in the crafts section at Walmart, or any crafting store like Michael’s or Jo-Ann’s, as well as Amazon
  • Clock works kit — the kit you choose is partially determined by the depth of your stretched canvas frame. I bought the 3/4″ kit for the 1″ deep canvas. Available at Michael’s or Amazon.
  • Staple gun
  • A tube of E6000 glue or a hot glue gun
  • One piece of shim or other long flat wood, at least 12″ long

After sewing the Dresden, I applied it to the background fabric with a running top stitch, and quilted the background fabric with a simple echo outline of the petals. You can get as creative or simple as you want. I centered and stretched the finished block on the canvas, and secured it using an electric staple gun, stapling it to the back of the canvas’s frame, much like you’d reupholster a chair. Find the center of the Dresden Plate by putting a straight pin through it from the front, and mark that location on the back of the canvas. Clip a small hole where you marked the pin, put the stem through the fabric from the back and on the front, assemble the hands on the front as directed in the clock works instructions. Finish by hot gluing the back of the clock works to the shim so it is straight and won’t move, and secure the shim to the frame of the canvas with hot glue. Be sure you don’t cover up the dial adjustment or battery case on the back with the shim. My mounting was disappointingly askew on my first clock, but it will be better next time. Trim any excess fabric on the back, hang and enjoy!

20180407_223437_Film1-1.jpg

In Search of the Perfect 5″ Quilting Block

A Garage Sale Treasure

20180220_193731_Film1.jpgThis isn’t a product review, the product featured is discontinued.  It’s more of a testimony of what you can do with some creativity.  A couple of years ago, I found a Fiskars® Fuse Creativity System® letterpress/die cutter at a garage sale. From what I’d read it was designed for paper crafting like cutting shapes for making cards or scrap booking, neither of which are hobbies I ever took up. MartMan was impressed with how substantial the Fuse was, so he bought it. I wasn’t sure what to do with it, so it sat in my sewing room, under my sewing table. In all the time I’d had it, all I had done with it was some embossed coaster type things for work.

20180318_184455_Film1.jpg

Corn filled neck warmers

After my recent sewing room reorganize effort, I tried to sell the Fuse on a re-sale group online. It didn’t get much interest, which brings me to my discovery. Originally I had pulled it back out to make some tags for neck wraps I’m making. But I’m not really a paper crafter and it wasn’t a particularly creative experience.

Fotor_149845264819793

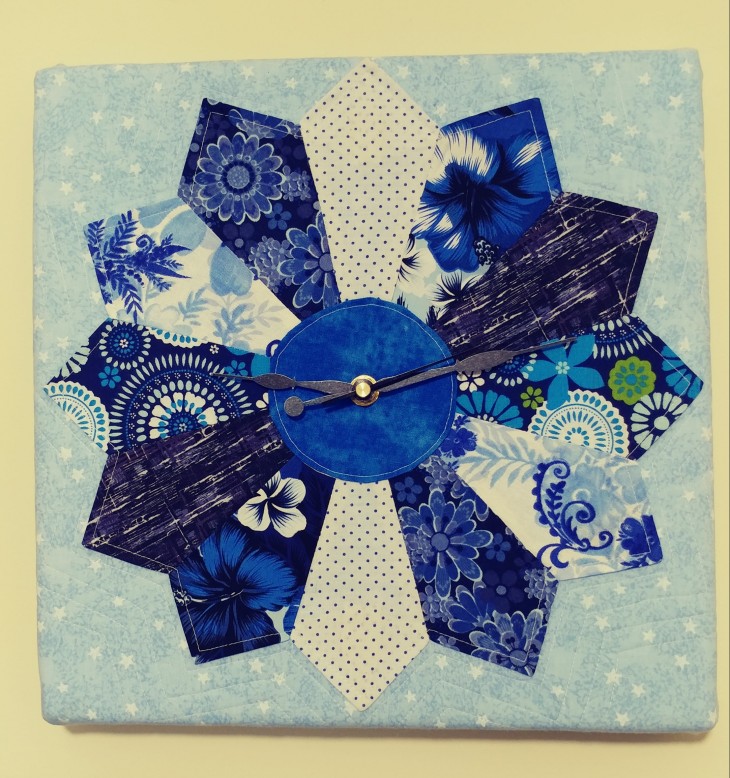
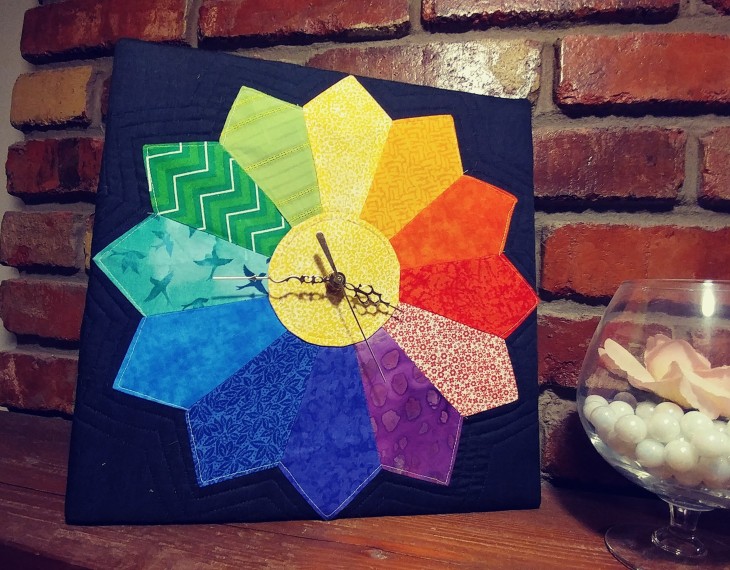
I work with fabric, including quilt blocks for bags and pouches. The most time consuming part of the process is cutting all those perfect squares. If you don’t have a perfect square, you will play heck getting perfect points on the finished block and having a nice looking finished panel. I sat and looked at the Fuse wondering if there was a die available for it that would cut fabric, in particular, 5″ squares. A Google search brought me to a video from MaterialGirl338 on YouTube where she used an Accuquilt® die to cut fabric in her new Fuse.

I knew fabric cutters like the Accuquilt GO!® existed, but at $250 to $400 for the starter set, I couldn’t justify it for my hobby crafting. But the Accuquilt cuts perfect, intricate shapes just by rolling the fabric and die with the appropriate shims through the press — a press that looks a lot like a Fiskars Fuse. Accuquilt has fabric cutting dies in a variety of shapes that Fiskars never manufactured, including triangles and squares for making quilt blocks. The cutting dies also look suspiciously a lot like the Fuse dies. It occurred to me, could the Fuse be used with other manufacturer dies to cut fabric? After some more digging, the answer is a resounding YES.

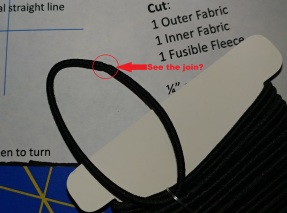
So, I purchased the optional Fuse Adapter kit*, still readily available on Amazon and eBay, and the 5″ square Accuquilt GO® die. Within a few minutes, following the instructions on the info card, I was making perfect 5″ squares in a fraction of the time I’d been spending. It’s fabulous. It accommodates up to five layers of quilting weight cotton, cutting two 5″ squares on each piece of fabric in one pass.


This slideshow requires JavaScript.

20180323_224736_Film1.jpg

I looked on Craigslist, and even today I see used Fuse units for sale, usually around $50 for the base unit kit — about a third of the original price. I purchased the optional Adapter Kit for $45 new, and the Accuquilt 5″ square die for $30, new. Between the used base unit, and the new Adapter Kit and die, for about $125, I’m cranking out 5″ squares like a pro.

20180323_210321_Film1.jpgThe info card that came with the Adapter kit lists a number of different die manufacturers that the Fuse will accommodate, including Sizzix®, another very popular die cutting system.

I’m keeping the Fiskars Fuse. And oh, look at the calendar — it’s the end of March, so it’s almost garage sale season again here in Kansas City.

*Although I can’t endorse it, I have seen one YouTube video where the author is using inexpensive Lexan sheets in various thicknesses from the hardware store instead of the Fuse Adapter kit and achieving good results in her Fuse.

Sewing Room Makeover

I’m still fighting the winter blahs and have been creatively uninspired in my sewing room lately, so I decided to do something I’ve been wanting for myself for a while.

Several weeks ago, I moved my sewing room from the front of my family room, to the back.  It’s a slightly smaller space, so I did a lot of de-cluttering and organizing and am extremely happy with the outcome.  I also now have a nice sitting area in front of our lovely fireplace again in the front part of the room.

Sewing Room Makeover

The new space.  I’ve been asked about the tables — the table on the left is our old dining room table with the center leaf in place; the table in the center is two 4-cube bookshelves with an Ikea butcher block top, total cost about $150.  The wrought iron shelving is a $5 find at a garage sale.  The large 18 cube organizer is my fabric.

I’ve been wanting to make dust covers for my embroidery and sewing machines to help finish off the reorganizing. The fabric I wound up using was a hand-me-down from my friend, Anne, and worked out yardage-wise for some quick dust covers. Fitting a cover to the embroidery arm on the embroidery machine was a challenge, and I’m satisfied with the result.

I still don’t know what to do next, but I do feel like I got something done.  Hopefully, with Spring just around the corner, I’ll start feeling creative again.

20180307_084234_Film1-1.jpg

Hello Fireplace!  Maybe wine and a good book?


My inspiration to create has vanished.

WhereIsMyInspirationI keep going down to my sewing room and sitting in a chair staring at all I’ve accumulated to create with, and I can’t get started.  I look at Pinterest, and I save pins, but nothing is sparking “it”.  Nothing appeals to me.  I look at the stuff I have already created and all I see are flaws.  I don’t enjoy sewing clothes, because I don’t like my size, and I can’t seem to figure out what size to use in patterns.  My bags and totes don’t seem good enough to sell — everyone else’s things are perfect, their topstitching is gorgeous, their fabric is ironed flat, and their shapes are smooth and crisp, their binding is beautiful, and their seams have no buckles or puckers.  I can point out every mistake I’ve made.

I feel a little lost.

Image: Noemi, MaDe-WhIt-LoVe
Coffee cup cozy and mug rug tutorial you can make yourself with free pattern template. Fits those Starbucks cups too!

Free Coffee Cup Cozy / Mug Rug sewing tutorial and pattern!

Coffee cup cozy and mug rug tutorial you can make yourself with free pattern template. Fits those Starbucks cups too!
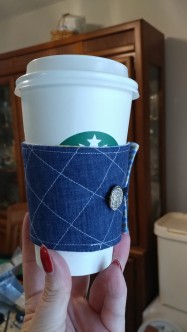
A mug rug / coffee cup cozy you can make and give for Christmas gifts, or any time of the year.  Get my free pattern below and have fun!

A Corky Cup Christmas

Corky Cups are reusable plastic cups that use the natural thermal insulation ability of cork. The cup is eco-friendly and has a screw-on lid with spill-proof silicone seal for leak resistance.  They sell for $5 to $7 each, depending on where you buy them.

I caught the Corky Cup on an amazing sale in September at of all places, Menards.  If you don’t have one of these hardware superstores in your area, you are most likely snickering at the name right now.  They compete with other big box hardware-type stores, like Home Depot or Lowes.  My husband loves Menards (stop snickering) and goes as often as possible (seriously, I see you there, stop snickering).  In September, they featured the Corky Cup at an unbelievable price compared to Walmart or Amazon, so I stocked up. The product description says the cork stays cool to the touch, but I decided to make personalized mug rugs for them, and give them as office gifts during the winter holidays (shhhh, no telling).  Here is my coffee cozy adaptation and pattern so you can make your very own.

20170930_230401.jpg

This project is super easy and scrap-friendly.  You will need:

  • two coordinating fabric pieces, at least 11″ x 6.5″
  • a piece of fusible fleece, Pellon Thermolam, Insulbrite insulated batting or cotton batting of the same size*
  • a piece of Pellon Shape-Flex of the same size (optional)
  • a cute button
  • a hair elastic in the color of your choice (I bought my elastics 30 black on a card at the dollar store, but they have smaller quantities in bright colors too)
  • My Coffee Cozy Pattern

The pattern includes markings for centered visual straight lines so you can machine embroider or applique yours, as I will for holiday gifts.

*If you’re not using fusible fleece or Thermolam, you’ll need to quilt your outside fabric so the batting doesn’t shift inside the finished cozy.

The quick instructions are:

  1. Start by printing the Coffee Cozy Pattern at 100%.  Cut out your fabric and fleece and start assembling.
  2. Fuse the fleece or Thermolam to the wrong side of the outside fabric (or quilt as needed, like I did for my sample here).  Optionally, if you choose to give your project a little extra stability, fuse the Shape-Flex to the wrong side of the inside fabric.
  3. Place your front and back fabric pieces, right sides together, and position your hair elastic as noted on the pattern.

    elasticjoin

    Here’s the fiddly part about these elastics — if you look at them, they’re not a continuous loop.  They have been fused together.  Since this is a weak point, make sure this part winds up inside, between the two layers of fabric when you sew it down.

  4. Stitch together the front and back pieces, right sides together, leaving an opening on the bottom edge, about 2″ in length to turn.
  5. Clip the corners and trim the seams.
  6. Turn the cozy right sides out through the hole you left.  Poke out the corners, and press, turning under the seam allowances on the front and back pieces in the opening you left.
  7. Top stitch the finished piece, closing the opening.  Stitch close to the edge.
  8. Wrap your project around a cup, pull the elastic taut but not too tight and mark for button placement.  Sew on the button and you’re done!


And the best part?  It fits those Starbucks® cups we all love.  Mmmm, Chai Tea Latte.

20171001_165608.jpg

Boo!

Time for new door decor

21641008_10215044818220392_913276088074674046_oToday I made the switch from summer to Halloween on my front door.  I found a similar wreath on the enternetz, and this is my take on it with the pieces/parts I could source locally.  I think she came out pretty well.  I have materials to make more, so if you’re interested in your very own for $120, leave me a comment and I’ll get back to you!

That Project You Hate

Seriously, I hate this project, yet I feel compelled to at least finish it.

Mccalls 3979Count this as a sewing misadventure.

Several years ago I bought this McCalls apron pattern not realizing every apron had bias binding on every seam.   E . v . e . r . y . seam.  Of all the sewing projects I’ve done, I have learned I intensely dislike applying bias binding.  I’ll never actually make quilts because I don’t want to have to bind the edges.  I HATE applying bias tape and I suck at it.

I had high hopes cutting this out.  Then I started to assemble. The first step was to apply double-fold bias tape around curved pockets.  Sigh, okay, fine, so I missed that when I bought it.  I’ll do it.  Next step.  Wait, bias tape where?  What?  Why?  Crap — every freakin’ seam.  All of them.

But I had started, the pieces were cut out, so I figured, I’ll finish.  I don’t think I can.  Not tonight anyway.  I hate this in every way.  I used bias tape that was too large; it’s just sloppy looking to me.  I don’t even know what I’ll do with this when I’m done.  I can’t even give it away and feel good about it.

I will put the neck straps on in the morning, and the last freakin’ piece of bias tape across the top of the top front panel — because I’ve gotten this far, I’ll finish.  I can’t feel good about it though — I hate this project.  I should have stopped at the pockets.  Maybe someday I’ll learn to trust my first instincts, and give myself permission to give up before I’ve invested a day and a bunch of materials.

And maybe I’ll learn to spot patterns that have bias tape all over them before I buy them.  I just noticed this pattern is listed as “vintage” and if I’d have not cut the pattern pieces out, I could have sold the pattern on eBay for 12 bucks.

9/6/17:  Done.  Still hate it.

20170905_140802.jpg

I Found My Happy Place

I wish I’d taken a picture of the sight. It was a thing of beauty. A quilter’s supply garage sale, in a church gymnasium. A variety of ladies, most into their seventh decade, who have made quilting and crafting their lifelong hobby and career, selling the stuff they don’t need, want or use anymore, the stuff that’s been in bins in their closets and under their sewing tables — scraps, fat quarters, remnants, even some on-the-bolt fabric, buttons, zippers, webbing laid out before me — $1 here to fill a gallon ziptop bag, $3 there for a bag of precut charms. Oh, I get chills just remembering it. It was like Joann’s remnant basket, only hundreds of times better. It was an amateur crafter’s nirvana.

Okay, so I got five yards of awesome denim for $1. I got a bag of really nice precut charms for $3. I found a gallon bag of different colors of webbing for $5. And so much more. I spent $25ish and came out with a pile of dreams that covered my cutting table.

IMG_20170826_213540_602

I may have a problem here, I seem to be collecting fabric like I collect Pinterest pins — so far just great plans and ideas.

Time to get busy.

K.I.S.S.

Meet the insulated casserole carrier

20161105_163309

I saw these handy casserole carriers at the War Eagle Mill fall craft show in Arkansas last year.  This project is so useful and simple — it takes more time picking out cute coordinating fabric than it does to sew it up.  They take maybe an hour to make, if that.

Until you decide to make it not simple.

Here is my first casserole carrier — it’s also the most popular when I show off my work.  I’m not quite sure why pictures of pears is so appealing, but it is.  The inside is yellow gingham.  Simple.  Ones like this one sell at craft shows for $20 or so.

I decided to make a few more of these, and somewhere along the line I decided since I was using a large denim piece, I should quilt my next project to make it extra cute.

This is where the K.I.S.S. rule comes in. What should have been an hour or work at the most , drug on for hours. Hours. And once you start, you’re committed to finish.  It’s a beauty, but with both Insulbright on the inside piece and quilt batting on the outside piece, there’s more cost in materials. The plus side is it’s super heavy duty.  I suppose if you really have a casserole you want to keep warm for a while, this ought to do it.  Oh, and did I say it took hours and hours to quilt?  And three bobbins of thread.  Either I need to get faster at quilting, quilt less, or maybe that’s just not a good idea for this simple project.

This is not how you make money at a craft show, I’m sure. In the end, the carrier still does what the others do, for more cost and way more labor, and probably wouldn’t command the a price equivalent to it’s worth. So, in the future, I will K.I.S.S.

Unless the end result is really cute.  Like quilted denim, which is really, really cute.  

20170827_20283020170827_20201720170827_220245

Maybe a star pattern — six lines that intersect at the center — next time …

Update 9/1/17 – the star pattern: