Office Chair Makeover. Update your chair with new fabric.

Office Chair Makeover – No Sew Fabric Update

Office Chair Makeover. Update your chair with new fabric.

20171014_170002.jpgSecond office chair makeover, stripped screws and a trip to the hardware store

Meet my very expensive Merit chair that I’ve had for probably 20 years.  Ask any transcriptionist, our chair is our life.  We spend hours upon hours firmly planted in a chair working and if the chair doesn’t fit, your body will tell you all about it.  I love this chair, but I’m notoriously hard on my stuff, and she was showing wear.  The seat was very dirty, and probably 10 years ago I attempted a  “slipcover” of sorts and wound up with this very baggy, ugly plaid thing, making a dirty chair dirty and ugly.

20171015_165428.jpgToday I took apart her apart, and the only difference from the last makeover I did was this chair has a finished back on it, requiring fabric for both sides.  Taking the back apart required a pry bar and some gentle but firm coaxing.  Taking the screws that held the front of the backrest to the backrest support bar was a MAJOR challenge.  The screws that were originally used were machine screws and I swear they were glued in as they were screwed down.  I wound up stripping the Phillips heads while trying to take them out.  So, I also highly recommend a little device called the Grabit Damaged Screw Remover, which was easy enough that even I could work it.  A couple of new machine screws — thank you Lowe’s guy for helping me find the tool and the right screws — and the project was smooth sailing from there.

This project required:

  • Mallet
  • Pry bar
  • Pliers
  • A magnet to clean up all the staples you wind up removing (optional)
  • Phillips and flat head screw driver
  • 3/8″ staples
  • 1/4″ staples
  • Electric staple gun
  • Fabric, and fabric shears
  • Grabit Damaged Screw Remover and power drill (really optional)
Office Chair makeover with fabric for a fresh new look

Office chair makeover for a fresh new look

Office Chair makeover with fabric for a fresh new look

I had five consecutive days off of work, during which time I had a wishlist of things to get done.  I wound up only getting a few of the things on my list finished, but fortunately, the big one was my craft room chair makeover.

This chair is 20+ years old, and looked it.  There are tons of step-by-step videos on YouTube, and I would recommend starting there if you want to tackle a project like this.  It only took a few hours and some hard work once I got started.

A few tips:

  • share_temporary.jpg
    Krypto was totally uninterested in what I was doing

    Make sure that you have enough of whatever fabric you choose to match patterns if you need to.  I didn’t on this project because I was just using up a large upholstery weight remnant that I would never in a million years use for anything else and was doing the project just to see if I could.  I came close, but not quite.  Fortunately, this chair also has a black plastic shell for the backrest, so I only had to upholster the seat and front of the backrest.  We’ll just call my pattern mismatching intentional.

  • Work on those corners and angles.  I didn’t do it very well, so there are some visible folds on the edges, but they look okay, and definitely better than before.  My fabric didn’t have a lot of stretch, and that may have been the problem.
  • Take pictures, not just for before and after photos, but so you know how to reassemble your chair after you’ve disassembled it.
  • This project required a Phillips-head screwdriver, hammer, mallet, and Allen Wrenches.
  • I used an electric staple gun and 3/8″ staples.  Be prepared to use a little muscle to get your staples to go all the way in your wooden base.  I tried using longer staples, and they would not go all the way in.  In this case, less is better.
  • Have a sheet or something down on the floor so you can work without worrying about getting your project dirty.
  • I added some poly quilt batting, especially to the arms, which had totally deflated over the years.
  • I chose not to spray paint anything, as the base was in great condition.  The back is also a black plastic shell, with only minimal scuffing.  I just cleaned it well.

I still have a lot of leave left for this leave year, and two more chairs to do.  And better fabric.  And a little more motivation now that I’ve done it once.

UPDATE:  I had to redo my sad little lumbar pillow too.  I reused the stuffing with a little added.

PillowMakeover

Coffee cup cozy and mug rug tutorial you can make yourself with free pattern template. Fits those Starbucks cups too!

Free Coffee Cup Cozy / Mug Rug sewing tutorial and pattern!

Coffee cup cozy and mug rug tutorial you can make yourself with free pattern template. Fits those Starbucks cups too!
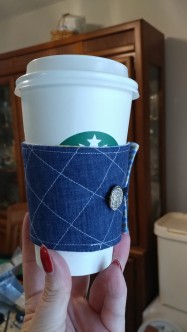
A mug rug / coffee cup cozy you can make and give for Christmas gifts, or any time of the year.  Get my free pattern below and have fun!

A Corky Cup Christmas

Corky Cups are reusable plastic cups that use the natural thermal insulation ability of cork. The cup is eco-friendly and has a screw-on lid with spill-proof silicone seal for leak resistance.  They sell for $5 to $7 each, depending on where you buy them.

I caught the Corky Cup on an amazing sale in September at of all places, Menards.  If you don’t have one of these hardware superstores in your area, you are most likely snickering at the name right now.  They compete with other big box hardware-type stores, like Home Depot or Lowes.  My husband loves Menards (stop snickering) and goes as often as possible (seriously, I see you there, stop snickering).  In September, they featured the Corky Cup at an unbelievable price compared to Walmart or Amazon, so I stocked up. The product description says the cork stays cool to the touch, but I decided to make personalized mug rugs for them, and give them as office gifts during the winter holidays (shhhh, no telling).  Here is my coffee cozy adaptation and pattern so you can make your very own.

20170930_230401.jpg

This project is super easy and scrap-friendly.  You will need:

  • two coordinating fabric pieces, at least 11″ x 6.5″
  • a piece of fusible fleece, Pellon Thermolam, Insulbrite insulated batting or cotton batting of the same size*
  • a piece of Pellon Shape-Flex of the same size (optional)
  • a cute button
  • a hair elastic in the color of your choice (I bought my elastics 30 black on a card at the dollar store, but they have smaller quantities in bright colors too)
  • My Coffee Cozy Pattern

The pattern includes markings for centered visual straight lines so you can machine embroider or applique yours, as I will for holiday gifts.

*If you’re not using fusible fleece or Thermolam, you’ll need to quilt your outside fabric so the batting doesn’t shift inside the finished cozy.

The quick instructions are:

  1. Start by printing the Coffee Cozy Pattern at 100%.  Cut out your fabric and fleece and start assembling.
  2. Fuse the fleece or Thermolam to the wrong side of the outside fabric (or quilt as needed, like I did for my sample here).  Optionally, if you choose to give your project a little extra stability, fuse the Shape-Flex to the wrong side of the inside fabric.
  3. Place your front and back fabric pieces, right sides together, and position your hair elastic as noted on the pattern.

    elasticjoin

    Here’s the fiddly part about these elastics — if you look at them, they’re not a continuous loop.  They have been fused together.  Since this is a weak point, make sure this part winds up inside, between the two layers of fabric when you sew it down.

  4. Stitch together the front and back pieces, right sides together, leaving an opening on the bottom edge, about 2″ in length to turn.
  5. Clip the corners and trim the seams.
  6. Turn the cozy right sides out through the hole you left.  Poke out the corners, and press, turning under the seam allowances on the front and back pieces in the opening you left.
  7. Top stitch the finished piece, closing the opening.  Stitch close to the edge.
  8. Wrap your project around a cup, pull the elastic taut but not too tight and mark for button placement.  Sew on the button and you’re done!


And the best part?  It fits those Starbucks® cups we all love.  Mmmm, Chai Tea Latte.

20171001_165608.jpg