Jewel Tote Bag

Not really quilting, but some fun with patchwork

Today I pieced a Jewel Bag using instructions from popularpatchwork.com.  The Sweet Sixteen Bag uses 16-5″ charm squares for the outside and 16 more for the lining.  I chose a solid piece of fabric for the lining using the completed outside piece as a pattern, and added a Cam Snap closure.  I used fusible fleece inside rather than quilting it, but this could easily be quilted for a little extra visual effect.

I’ve seen this shape tote called a Jewel Bag, but I’ve seen similar shapes called Hobo Bags or Slouch Bags.  I chose to put a mesh stabilizer in the bottom of my bag to give it shape, and hubby suggested with this shape it looked like a great lunchbox.  He also suggested that with the unusual top of the bag, I could add a little lace, make it look like a bra and call it a Lingerie Bag.  We don’t always listen to him.

I love these denim pieces.  I’ve been repurposing old jeans with blown out backsides or otherwise just too ratty to keep.  I’ve got some great jean fronts saved up to make a couple more aprons on a cold winter day.

Miscellaneous Sewing Stuff

This will be a running post with some miscellaneous projects.

7/2017 – Cross body bag with front pocket for small items, like a phone, pens, notepad, etc.  This one is custom made to the size of whatever tablet you want to put into it.  Mine is for my Asus Transformer with keyboard.  I adapted the Crazy Little Projects Laptop bag.

8/2017 – Silly little sewing project – pumpkin-style pincushion using instructions from CraftyGeminiCreates.  My flat-head quilting pins needed a home and it used up some fabric scraps.

Quilted Patchwork Totes

My newest obsession, the quilted patchwork tote.

My first charm pack tote was kind of a fluke. I like to buy decent-sized fabric remnants at thrift stores, and I found one particularly generous pack of several remnants that when I got it home and unfolded, discovered was actually one large remnant with a stack of pink and purple poorly cut squares. Someone was going to make a little girl’s quilt and stopped after rough-cutting charms. New challenge — make something out of these otherwise useless squares.

My first project was based on a YouTube video tutorial from Missouri Star Quilt Company.  The tote is lined and I added a CamSnap at the center top after these pics were taken.

My second tote was based on Charm Pack Tote Bag Tutorial-Sewn Up from Sewn Up.  This bag was not quilted, but is traditionally lined, so I went ahead and quilted the front, back and bottom panels separately and then sewed them together as I added the inset ruffle.  This one was my new favorite.

While I was creating the mauve tote, I knew I wanted to make a denim patchwork tote. This bag is based on Sewn Up’s Charm Pack Tote Bag with Pocket (I didn’t add the pocket), and I used the Classic Bow Tutorial from Better Homes and Gardens to make the perfect decorative bow.  Again, I quilted my bag, but because the accent ribbon and bow are sewn on after the bag is assembled, I was able to quilt the bag in one large piece.

I’ll definitely be making more of these totes, experimenting with sizes and shapes of the charms.

Update:  Gorgeous greens with diamond quilting.

Update:  Thanks Teresa Mairal, TeresaDownUnder, at Sewn Up Patterns for the nice note back!

Update 8/13:  Here’s a project that was meant to be something else, but I completely screwed it up, so it became this instead.

Don’t Iron Plastic, Kids

How to Clean a Hopeless Iron.

20170630_193930
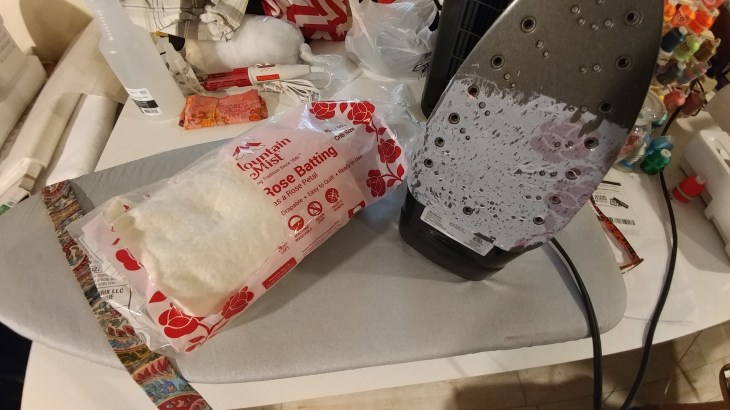
Seems like an obvious statement, I know.  “Don’t iron stuff that will melt.”

But stuff happens sometimes.

So this happened tonight.  My iron tipped for a second at the most, as I was pressing a strap.  Unfortunately, it rested right smack on a thin plastic bag that melted instantaneously.  The plastic fused to the sole plate and was so thin and smooth it was NOT coming off.  I tried ironing waxed paper.  I tried gently scraping, I tried freezing and gently scraping, I tried Magic Erasers, and I tried dryer sheets by themselves.  Nothing budged this stuff.  It was one with the iron.

So here’s the trick – it’s a combo trick.

Waxed paper
Salt
Clean dryer sheets

Turn your iron on the hottest setting.  Put some table salt on a sheet of waxed paper, and on a surface that you won’t damage with a hot iron, iron the salt on the waxed paper.  The salt will cling to the iron, the iron will smoke.  Immediately iron a couple of clean dryer sheets.  You’ll see the melted stuff come off on the dryer sheets.  Repeat until clean.

Fotor_149887707260946


Repurposed Men’s Shirt Apron

Once upon a time, thi20170529_125418_HDR-1
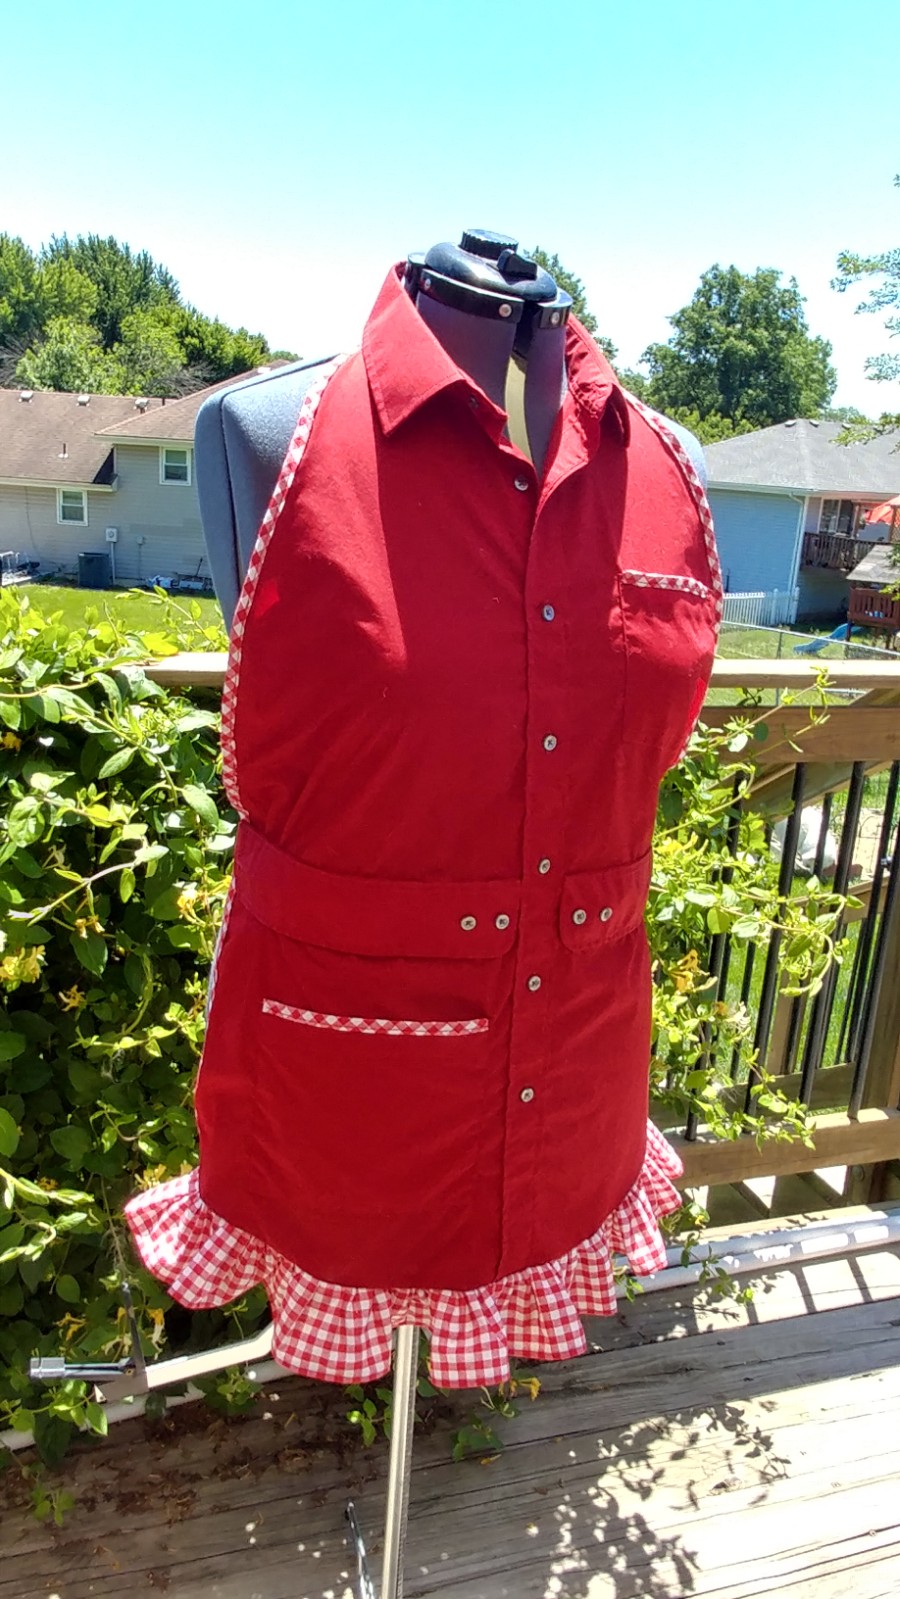
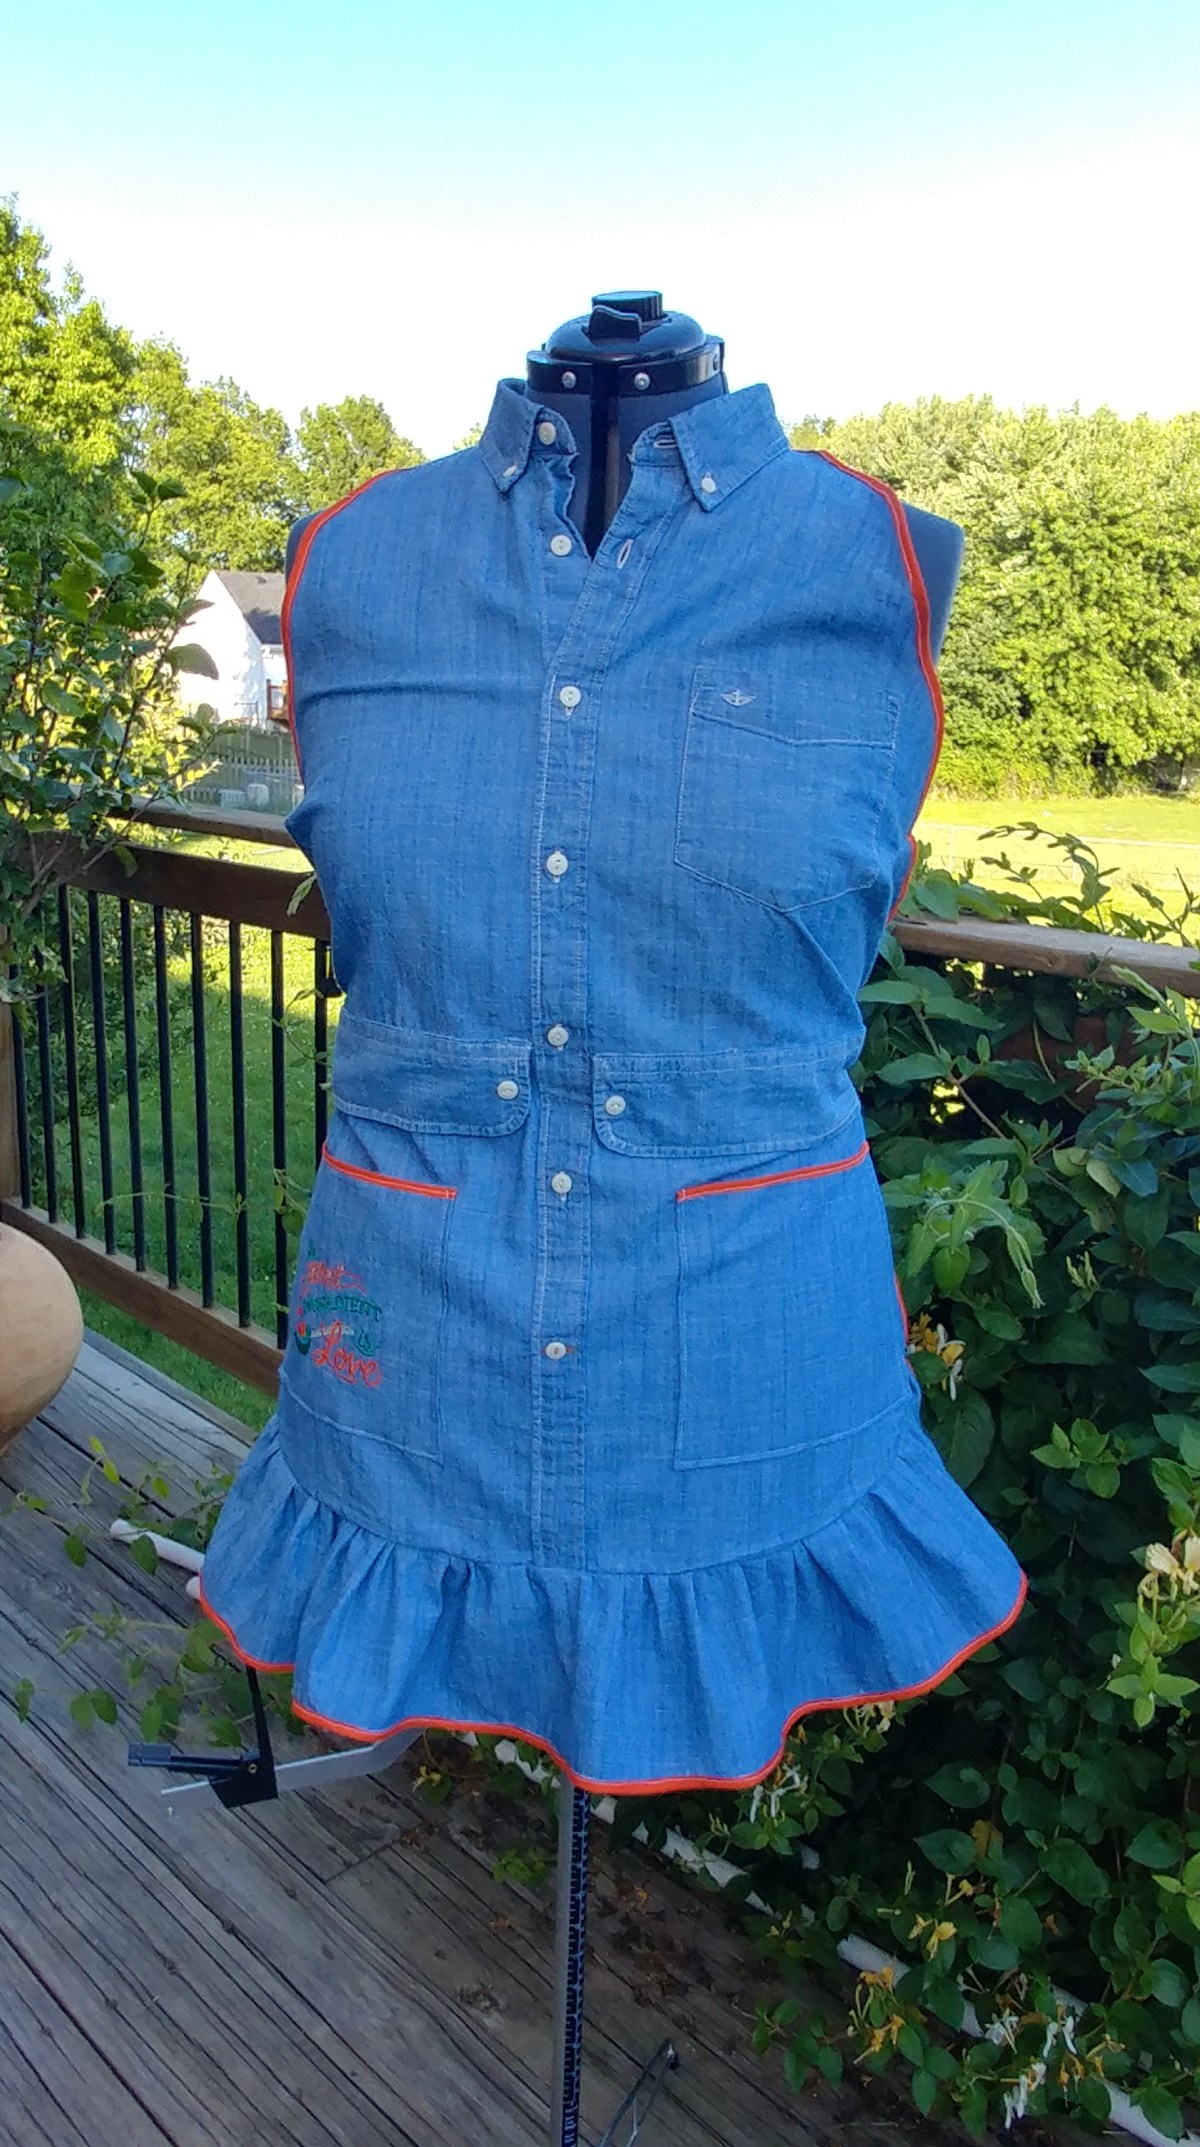
s was a men’s long sleeved Faded Glory shirt in size XL that I bought for $2 at a thrift store.  I’m fascinated by aprons, even though as far as I know, only one or two people I personally know actually uses one.  I don’t even use one.

I added about a yard of red gingham fabric for the bias trim and ruffle.  I reused the sleeves to make the ties and the cuffs became a mock waist.  This project taught me lots of things.  First and foremost, I hate binding.  HATE it.  I don’t want to hand sew one side, and I’m not good at catching both sides neatly with the sewing machine. I keep thinking practice will make it better, but honestly, if there is a way I can avoid this in the future, I will.  Applying binding to this has made me question the entire project because it’s not perfect to me.

I am satisfied with the end product though, considering I winged this project.  I didn’t have a pattern or a step-by-step blog to follow.  There are lots of blogs and pins you can find on Pinterest, but I relied a lot on just watching a bunch of YouTube videos to get me started.

I have got to start selling some of the stuff I make.

Just Call Me a Sewing Machine Mechanic

Music to my ears, the purr of my old sewing machine.  My old White/Universal metal baby was purring no more though.  Locked up solid, she has been living in my closet for the last year.

20161018_234710Made of all metal shafts and gears, I had bought my old Model 4400 in 1984.  It was my first machine, and over the years it had made pillows, curtains, purses, pouches, costumes, aprons, even clothing back when I wasn’t so “curvy”.  Computerized machines with a zillion fancy stitches  are nice and all, but I never use much more than straight and zigzag stitches anyway, and the computerized models just won’t do just plain old straight sewing well, through any kind of thickness, and the stuff I make tends to have thickness or heavy seams.  Beep, beep, beep. Fist pounding.  Curse.

20161018_234741If you have an old machine sitting around, they aren’t that hard to figure out.  Metal parts need lubrication, and eventually parts can just freeze in place.  I’m not the most mechanical person, but I had hoped if I could find the spot that was locked up, I could point someone who is mechanical in that direction to fix it.  And besides, it was not working anyway, it’s not like I was going to hurt it.  So I took off the top and side covers of the machine, removed the hand wheel and just watched what happened when I pressed the foot pedal.  Nothing happened.  The motor whirred, but nothing moved — at all.

20161018_234751So I started with the belts and flywheels near the motors — or are they pulleys?  I don’t know, they’re round and weren’t spinning.  Thingamabobbers.  Whosie whatsits.  I tried to turn each of the two flywheels by hand, and found the culprit.  The bigger of the two wheels, the one on the left, wouldn’t budge.  I braved a pair of pliers, grabbed the wheel and gently twisted.  It broke free pretty easily.  Once free, and after a good oiling, it was spinning like a top.  I oiled the rest of the drive shaft and gears because everything had gotten pretty tight, even with standard oiling over the years.  My biggest snaffu was the research required on how to put the hand wheel back on properly.  I finally figured out there was a washer that I didn’t notice had fallen off the hand wheel cap, which as it turns out is a really integral part of the whole thing.  Not only is it integral, it has a top and a bottom and has to be installed correctly oriented.

My old machine has a new life, and has started to purr again.

There wasn’t a lot of instructional videos on YouTube that talk about these 1970s/1980s metal machines.  Either you were repairing the antique Singer machines, or you were troubleshooting a new, computerized machine.  I highly recommend the New Mexico State University College of Agricultural, Consumer and Environmental Sciences Sewing Machine Maintenance Guide, for some basic info on how these simple 1970s style machines work — and to point out there’s a washer laying around somewhere you just might need, and that little mark on the washer means “top”.

Now to figure out tensioning.  And to get my nails re-done.  Turns out sewing machine oil dissolves gel polish.

The Essentials Only Cross Body Pouch

BagCombo.jpg

I carry a cross body bag daily, but like most purses, it tends to gather what feels like rocks.  I don’t know why, but it’s always overflowing with just stuff, most of which I don’t need to lug around all the time. If I have a lot of walking to do, I prefer to be hands-free and to carry just the necessities — phone, credit card wallet and coin pouch.  To that end, I created my own smartphone cross body pouch — designed to hold just the essentials when I’m out running around from the grocery store, to garage-saling, or to a craft fair.

This pouch is tall enough, and more than wide enough, to fit my Samsung Note 4, one of the biggest smartphones out there.  Lined with no visible seams, this bag is simple to customize.  Experiment with by combining different fabric colors and patterns between the three main outside pieces, different closures, and different straps, all in the same pouch.

You’ll need:

  • Outer fabric
  • Coordinating Lining fabric
  • Coordinating zipper, at least 8″ long (we’ll cut this down)
  • Fusible Fleece
  • KamSnap, button, Velcro or some other closure for the flap.
  • Two small swivel hooks.
  • Download the  essentials-only-cross-body-pouch-pattern. All pieces are on one sheet.  Print three copies at 100%, and cut out the pieces A through D.

Piece A – the back and flap.
Cut 1 outer
Cut 1 lining
Cut 1 fusible fleece

Piece B – upper front.
Cut 1 outer
Cut 1 lining
Cut 1 fusible fleece

Piece C  – lower front.
Cut 1 outer
Cut 1 lining
Cut 1 fusible fleece

Piece D  –  Pieces B and C, for pocket lining.

Cut 1 lining

For the strap tabs, cut two rectangular pieces 2″ x 3″ each.

  1. Cut Outer and Lining fabrics, and fusible fleece, as noted above.
    cutfabric
  2. Prepare the tabs. Fold tab in half lengthwise and press.  Fold the edges inside, press again.  Resulting  strip will be 1/2″ wide.  Topstitch to close.  Set aside.
    20161010_125201
  3. Iron fusible fleece to the outside pieces A, B and C.
  4. Attach zipper to front pieces, B and C.  Lay the Lining piece B down, right side up.  Lay zipper, face up, on top edge, aligning edges.  Lay the Outer piece B on top, right side down, aligning all, creating a “zipper sandwich”.  Stitch.
    20161010_132500a.  Fold back the outer and lining fabrics so they are both right side out, and press, exposing the unsewn edge of the zipper.

    20161010_134244.jpg

    b.  Repeat step 4.a. for the other half of the front, piece C.  Take care to sew the straight edge of the fabric to the zipper, not the curved corner side.

    20161010_134612.jpg

    In this step, be sure to match patterns better than I did.  I realized when I got done, I’d put the top portion of the pocket on upside down, so the chevron pattern didn’t match properly.  But, I kind of liked the look and opted to leave it alone.

    c.  Fold back the outer and lining so they are both right side out, and press.  Topstitch along the edge of the zipper teeth on both sides.

    20161010_135141.jpg

    d.  If you’re using Velcro as a closure, now is the time to sew a rectangle of Velcro down in the center of the top portion of the pocket.  If you’re using a KamSnap or button, skip this step.

  5. Lay pocket lining D wrong side up on front zipper panel, also right side up.  Trim the pocket lining at the straight edge if it’s too long.  Stitch.  Turn under and press.  Topstitch.
    20161010_140521.jpg

    20161010_140655.jpg

    20161010_141010.jpg

    20161010_141121.jpg

  6. Open zipper halfway and baste pocket lining to pocket front to hold in place while finishing.  Double stitch over the zipper to secure.  Snip the excess zipper on both sides.
    20161010_144427.jpg
  7. Lay fold one tab from step 1 in half, and lay with loop toward the center on the front of the pocket piece.  Baste in place.  repeat on other side.  Trim ends.
    20161010_145102.jpg
  8. If you’re using Velcro, now is the time to stitch a rectangle to the top center of Piece A Lining. If you’re using a KamSnap or button, skip this step.
  9. Lay piece A, Outer Back down, right side up. Lay finished pocket on top of back, right side down.  You can baste stitch the pocket to the back at this point if you want, but you don’t have to.  Lay piece A, Lining Back face down on top of all.  Pin or clip in place.  Stitch around the entire outside edge, leaving a 2″ or so opening in one side of the flap so you can turn the entire piece when done.  Trim seams, clip curves.
    (A cute customization idea, during this step try sewing a simple loop in at the center of the top of the Back flap, when you can then attach to a button sewn to the front pocket of the pouch as the flap closure.)

    20161010_145204.jpg

    20161010_150107.jpg

    20161010_151559

  10. Turn the pouch right side out through the opening left in the flap.  Turning is tedious, and there’s some bulk that will have to go through the hole you left.  Once turned, press the entire pouch flat, turn the raw edges of the hole you left to the inside and press flat.  Whip stitch closed.
    20161010_153146.jpg

    (Optionally, if the fabric is not too thick, topstitch around the entire perimeter of the pouch and flap, including closing the opening.  If you choose to topstitch, don’t topstitch over the zipper.  Topstitching is usually a nice finish, but in this case I think it makes the whole pouch appear kind of flat, a look I didn’t care for after I did it.)
  11. If using a button, add a buttonhole to the completed flap now. Sew down a button to the top of the front pocket.  If using a KamSnap, apply it now similarly positioned.  I used a KamSnap on this pouch.  If you used a loop closure, sew your button down to the top of the front pocket now.
  12. Create a strap using complimentary fabric. A good length for the strap when used by an adult, is 50″. There are lots of options to attach the strap.
    – Try sewing a small D-ring into the loop to attach a swivel hook to when adding the strap tabs to the purse in step 7 above — or leave the loop plain.
    – Try leaving the loop plain and slipping the end of a rope or very narrow sewn strap through the loops, then tie a knot in the end right under the loop, and tack the knot down to the bag for a “rustic” look.
    – For this purse, I opted for a narrow strap and swivel hook attaching directly to the loop.
    20161010_192504

Have fun experimenting with different scraps of fabric, different patterns and colors, and making a patchwork style pouch.  If you’re into machine embroidery, the back is more than suitable for an embroidered monogram, as is the lower part of the front pocket. Change up the shape of the flap.  These would make great gifts for anyone — I can envision shortening the strap for a teenager and using their school colors.

Thanks for trying out my very first tutorial and if I can answer any questions, leave me a message.

Milady

Fun With Flags

Hello.

I am Milady, and welcome to the premiere episode of IAmMilady Presents Fun with Flags. Tonight, you and I are going to explore the dynamic world of vexillology.

What is Vexillology, you ask?  Vexillology is the study of flags.

Tonight we will learn about the garden flag.  The garden flag is a piece of cloth or similar material, typically oblong or square, attachable by one edge, known as the hoist, to a pole or rope and used as the symbol or emblem of a home or yard and used as decoration.

Take for example, these garden flags.  This flag design is machine embroidered on a burlap field using in fun colors and displaying welcoming words, and customized with the name of the domicile they will proudly fly on …

fun-with-flags

Whoa, I’ve learned so much.


Rub-a-Dub

20160408_150405Just a quick update on the crafting front.  MartMan (the hubs) has been interested in creating his own soaps, and I thought it might be nice to make him some “soap pockets” to put his creations in.

I used a throwaway towel for this first pouch, mostly to test my embroidery.  For a standard sized bar of Dove soap, I cut my fabric 5″x 9″.  I serged the inside edges of my pouch, which takes less seam allowance than sewing.  If you’re sewing, I’d recommend making the width a bit bigger, at least 6″ to a standard bar of soap, like Dove.  For MartMan’s homemade soap, I’ll have to adjust the width, since homemade soap bars tend to be wider.  If you’re putting your own soap in these pouches, measure the inside width of your mold and add enough for a 1/2″ seam allowance on each side, plus some give for the bulk of the soap.  9″ length is just about right.  20160408_150439

I embellished with binding on the envelope outside edges before folding and sewing together the long edges.  I used satin fabric cut 3″ wide, then ironed in half, then quarters folded over the edge and sewed on. This would be a good place to experiment with those decorative stitches on your sewing machine that you never use!

The claw foot tub and ducky embroidery is self-digitized using Singer’s Autopunch, which came with my embroidery machine, then Sew What Pro from S&S Computing.  I have three bubbles that float above ducky’s head, that I totally forgot to include.  It came out great though, and I see some improvements to be made for the next generation of soap pouches.

Determine your center for the back by measuring down from the top of the envelope 2″ and up from the bottom 3″.  The area in the center becomes your embroidery area for whatever design you put on the pouch.  After you’ve embroidered and installed the satin border, turn the pouch on itself, folding 2″ at the top, 3″ at the bottom.  You should have an overlap of about an inch.  Sew the sides, turn inside out and you’re done!