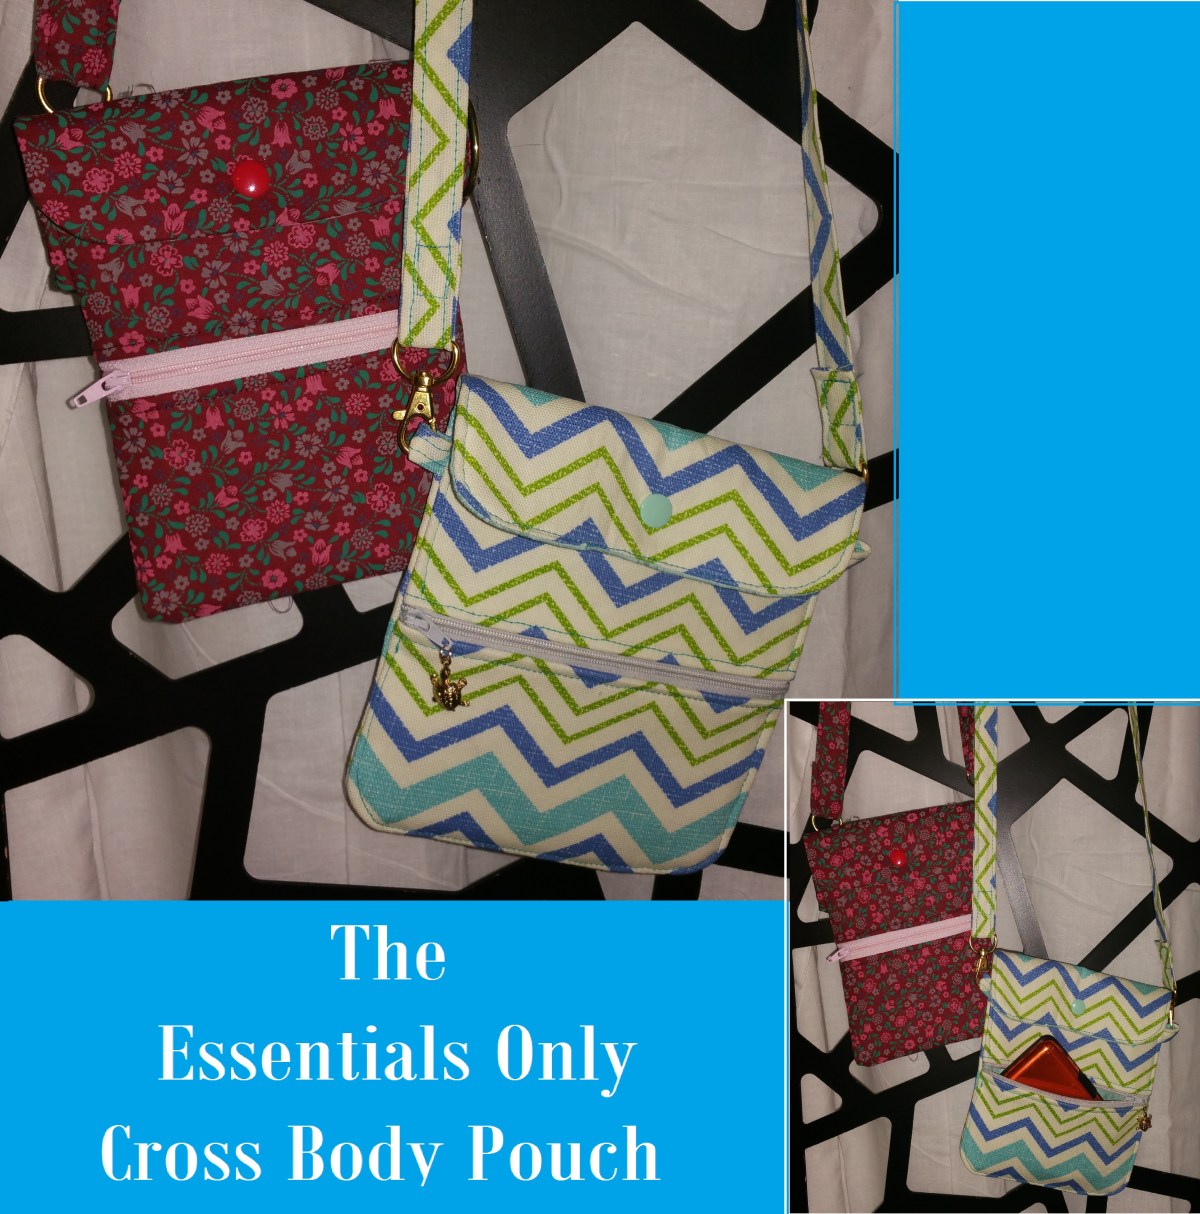

I carry a cross body bag daily, but like most purses, it tends to gather what feels like rocks. I don’t know why, but it’s always overflowing with just stuff, most of which I don’t need to lug around all the time. If I have a lot of walking to do, I prefer to be hands-free and to carry just the necessities — phone, credit card wallet and coin pouch. To that end, I created my own smartphone cross body pouch — designed to hold just the essentials when I’m out running around from the grocery store, to garage-saling, or to a craft fair.
This pouch is tall enough, and more than wide enough, to fit my Samsung Note 4, one of the biggest smartphones out there. Lined with no visible seams, this bag is simple to customize. Experiment with by combining different fabric colors and patterns between the three main outside pieces, different closures, and different straps, all in the same pouch.
You’ll need:
- Outer fabric
- Coordinating Lining fabric
- Coordinating zipper, at least 8″ long (we’ll cut this down)
- Fusible Fleece
- KamSnap, button, Velcro or some other closure for the flap.
- Two small swivel hooks.
- Download the essentials-only-cross-body-pouch-pattern. All pieces are on one sheet. Print three copies at 100%, and cut out the pieces A through D.
Piece A – the back and flap.
Cut 1 outer
Cut 1 lining
Cut 1 fusible fleece
Piece B – upper front.
Cut 1 outer
Cut 1 lining
Cut 1 fusible fleece
Piece C – lower front.
Cut 1 outer
Cut 1 lining
Cut 1 fusible fleece
Piece D – Pieces B and C, for pocket lining.
Cut 1 lining
For the strap tabs, cut two rectangular pieces 2″ x 3″ each.
- Cut Outer and Lining fabrics, and fusible fleece, as noted above.

- Prepare the tabs. Fold tab in half lengthwise and press. Fold the edges inside, press again. Resulting strip will be 1/2″ wide. Topstitch to close. Set aside.

- Iron fusible fleece to the outside pieces A, B and C.
- Attach zipper to front pieces, B and C. Lay the Lining piece B down, right side up. Lay zipper, face up, on top edge, aligning edges. Lay the Outer piece B on top, right side down, aligning all, creating a “zipper sandwich”. Stitch.
 a. Fold back the outer and lining fabrics so they are both right side out, and press, exposing the unsewn edge of the zipper.

b. Repeat step 4.a. for the other half of the front, piece C. Take care to sew the straight edge of the fabric to the zipper, not the curved corner side.

In this step, be sure to match patterns better than I did. I realized when I got done, I’d put the top portion of the pocket on upside down, so the chevron pattern didn’t match properly. But, I kind of liked the look and opted to leave it alone.
c. Fold back the outer and lining so they are both right side out, and press. Topstitch along the edge of the zipper teeth on both sides.

d. If you’re using Velcro as a closure, now is the time to sew a rectangle of Velcro down in the center of the top portion of the pocket. If you’re using a KamSnap or button, skip this step.
- Lay pocket lining D wrong side up on front zipper panel, also right side up. Trim the pocket lining at the straight edge if it’s too long. Stitch. Turn under and press. Topstitch.


- Open zipper halfway and baste pocket lining to pocket front to hold in place while finishing. Double stitch over the zipper to secure. Snip the excess zipper on both sides.

- Lay fold one tab from step 1 in half, and lay with loop toward the center on the front of the pocket piece. Baste in place. repeat on other side. Trim ends.

- If you’re using Velcro, now is the time to stitch a rectangle to the top center of Piece A Lining. If you’re using a KamSnap or button, skip this step.
- Lay piece A, Outer Back down, right side up. Lay finished pocket on top of back, right side down. You can baste stitch the pocket to the back at this point if you want, but you don’t have to. Lay piece A, Lining Back face down on top of all. Pin or clip in place. Stitch around the entire outside edge, leaving a 2″ or so opening in one side of the flap so you can turn the entire piece when done. Trim seams, clip curves.
(A cute customization idea, during this step try sewing a simple loop in at the center of the top of the Back flap, when you can then attach to a button sewn to the front pocket of the pouch as the flap closure.)


- Turn the pouch right side out through the opening left in the flap. Turning is tedious, and there’s some bulk that will have to go through the hole you left. Once turned, press the entire pouch flat, turn the raw edges of the hole you left to the inside and press flat. Whip stitch closed.

(Optionally, if the fabric is not too thick, topstitch around the entire perimeter of the pouch and flap, including closing the opening. If you choose to topstitch, don’t topstitch over the zipper. Topstitching is usually a nice finish, but in this case I think it makes the whole pouch appear kind of flat, a look I didn’t care for after I did it.)
- If using a button, add a buttonhole to the completed flap now. Sew down a button to the top of the front pocket. If using a KamSnap, apply it now similarly positioned. I used a KamSnap on this pouch. If you used a loop closure, sew your button down to the top of the front pocket now.
- Create a strap using complimentary fabric. A good length for the strap when used by an adult, is 50″. There are lots of options to attach the strap.
– Try sewing a small D-ring into the loop to attach a swivel hook to when adding the strap tabs to the purse in step 7 above — or leave the loop plain.
– Try leaving the loop plain and slipping the end of a rope or very narrow sewn strap through the loops, then tie a knot in the end right under the loop, and tack the knot down to the bag for a “rustic” look.
– For this purse, I opted for a narrow strap and swivel hook attaching directly to the loop.

Have fun experimenting with different scraps of fabric, different patterns and colors, and making a patchwork style pouch. If you’re into machine embroidery, the back is more than suitable for an embroidered monogram, as is the lower part of the front pocket. Change up the shape of the flap. These would make great gifts for anyone — I can envision shortening the strap for a teenager and using their school colors.
Thanks for trying out my very first tutorial and if I can answer any questions, leave me a message.

Awesome site Milady I love what you do.
LikeLike