Posts by gr8typist

Mom, wife, employee. I'm someone's daughter, sister, niece. Some I know, a lot I don't.
Office Chair makeover with fabric for a fresh new look

Office chair makeover for a fresh new look

Office Chair makeover with fabric for a fresh new look

I had five consecutive days off of work, during which time I had a wishlist of things to get done.  I wound up only getting a few of the things on my list finished, but fortunately, the big one was my craft room chair makeover.

This chair is 20+ years old, and looked it.  There are tons of step-by-step videos on YouTube, and I would recommend starting there if you want to tackle a project like this.  It only took a few hours and some hard work once I got started.

A few tips:

  • share_temporary.jpg
    Krypto was totally uninterested in what I was doing

    Make sure that you have enough of whatever fabric you choose to match patterns if you need to.  I didn’t on this project because I was just using up a large upholstery weight remnant that I would never in a million years use for anything else and was doing the project just to see if I could.  I came close, but not quite.  Fortunately, this chair also has a black plastic shell for the backrest, so I only had to upholster the seat and front of the backrest.  We’ll just call my pattern mismatching intentional.

  • Work on those corners and angles.  I didn’t do it very well, so there are some visible folds on the edges, but they look okay, and definitely better than before.  My fabric didn’t have a lot of stretch, and that may have been the problem.
  • Take pictures, not just for before and after photos, but so you know how to reassemble your chair after you’ve disassembled it.
  • This project required a Phillips-head screwdriver, hammer, mallet, and Allen Wrenches.
  • I used an electric staple gun and 3/8″ staples.  Be prepared to use a little muscle to get your staples to go all the way in your wooden base.  I tried using longer staples, and they would not go all the way in.  In this case, less is better.
  • Have a sheet or something down on the floor so you can work without worrying about getting your project dirty.
  • I added some poly quilt batting, especially to the arms, which had totally deflated over the years.
  • I chose not to spray paint anything, as the base was in great condition.  The back is also a black plastic shell, with only minimal scuffing.  I just cleaned it well.

I still have a lot of leave left for this leave year, and two more chairs to do.  And better fabric.  And a little more motivation now that I’ve done it once.

UPDATE:  I had to redo my sad little lumbar pillow too.  I reused the stuffing with a little added.

PillowMakeover

Coffee cup cozy and mug rug tutorial you can make yourself with free pattern template. Fits those Starbucks cups too!

Free Coffee Cup Cozy / Mug Rug sewing tutorial and pattern!

Coffee cup cozy and mug rug tutorial you can make yourself with free pattern template. Fits those Starbucks cups too!
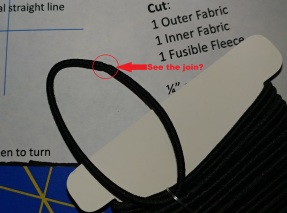
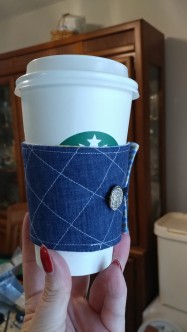
A mug rug / coffee cup cozy you can make and give for Christmas gifts, or any time of the year.  Get my free pattern below and have fun!

A Corky Cup Christmas

Corky Cups are reusable plastic cups that use the natural thermal insulation ability of cork. The cup is eco-friendly and has a screw-on lid with spill-proof silicone seal for leak resistance.  They sell for $5 to $7 each, depending on where you buy them.

I caught the Corky Cup on an amazing sale in September at of all places, Menards.  If you don’t have one of these hardware superstores in your area, you are most likely snickering at the name right now.  They compete with other big box hardware-type stores, like Home Depot or Lowes.  My husband loves Menards (stop snickering) and goes as often as possible (seriously, I see you there, stop snickering).  In September, they featured the Corky Cup at an unbelievable price compared to Walmart or Amazon, so I stocked up. The product description says the cork stays cool to the touch, but I decided to make personalized mug rugs for them, and give them as office gifts during the winter holidays (shhhh, no telling).  Here is my coffee cozy adaptation and pattern so you can make your very own.

20170930_230401.jpg

This project is super easy and scrap-friendly.  You will need:

  • two coordinating fabric pieces, at least 11″ x 6.5″
  • a piece of fusible fleece, Pellon Thermolam, Insulbrite insulated batting or cotton batting of the same size*
  • a piece of Pellon Shape-Flex of the same size (optional)
  • a cute button
  • a hair elastic in the color of your choice (I bought my elastics 30 black on a card at the dollar store, but they have smaller quantities in bright colors too)
  • My Coffee Cozy Pattern

The pattern includes markings for centered visual straight lines so you can machine embroider or applique yours, as I will for holiday gifts.

*If you’re not using fusible fleece or Thermolam, you’ll need to quilt your outside fabric so the batting doesn’t shift inside the finished cozy.

The quick instructions are:

  1. Start by printing the Coffee Cozy Pattern at 100%.  Cut out your fabric and fleece and start assembling.
  2. Fuse the fleece or Thermolam to the wrong side of the outside fabric (or quilt as needed, like I did for my sample here).  Optionally, if you choose to give your project a little extra stability, fuse the Shape-Flex to the wrong side of the inside fabric.
  3. Place your front and back fabric pieces, right sides together, and position your hair elastic as noted on the pattern.

    elasticjoin

    Here’s the fiddly part about these elastics — if you look at them, they’re not a continuous loop.  They have been fused together.  Since this is a weak point, make sure this part winds up inside, between the two layers of fabric when you sew it down.

  4. Stitch together the front and back pieces, right sides together, leaving an opening on the bottom edge, about 2″ in length to turn.
  5. Clip the corners and trim the seams.
  6. Turn the cozy right sides out through the hole you left.  Poke out the corners, and press, turning under the seam allowances on the front and back pieces in the opening you left.
  7. Top stitch the finished piece, closing the opening.  Stitch close to the edge.
  8. Wrap your project around a cup, pull the elastic taut but not too tight and mark for button placement.  Sew on the button and you’re done!


And the best part?  It fits those Starbucks® cups we all love.  Mmmm, Chai Tea Latte.

20171001_165608.jpg

Boo!

Time for new door decor

21641008_10215044818220392_913276088074674046_oToday I made the switch from summer to Halloween on my front door.  I found a similar wreath on the enternetz, and this is my take on it with the pieces/parts I could source locally.  I think she came out pretty well.  I have materials to make more, so if you’re interested in your very own for $120, leave me a comment and I’ll get back to you!

That Project You Hate

Seriously, I hate this project, yet I feel compelled to at least finish it.

Mccalls 3979Count this as a sewing misadventure.

Several years ago I bought this McCalls apron pattern not realizing every apron had bias binding on every seam.   E . v . e . r . y . seam.  Of all the sewing projects I’ve done, I have learned I intensely dislike applying bias binding.  I’ll never actually make quilts because I don’t want to have to bind the edges.  I HATE applying bias tape and I suck at it.

I had high hopes cutting this out.  Then I started to assemble. The first step was to apply double-fold bias tape around curved pockets.  Sigh, okay, fine, so I missed that when I bought it.  I’ll do it.  Next step.  Wait, bias tape where?  What?  Why?  Crap — every freakin’ seam.  All of them.

But I had started, the pieces were cut out, so I figured, I’ll finish.  I don’t think I can.  Not tonight anyway.  I hate this in every way.  I used bias tape that was too large; it’s just sloppy looking to me.  I don’t even know what I’ll do with this when I’m done.  I can’t even give it away and feel good about it.

I will put the neck straps on in the morning, and the last freakin’ piece of bias tape across the top of the top front panel — because I’ve gotten this far, I’ll finish.  I can’t feel good about it though — I hate this project.  I should have stopped at the pockets.  Maybe someday I’ll learn to trust my first instincts, and give myself permission to give up before I’ve invested a day and a bunch of materials.

And maybe I’ll learn to spot patterns that have bias tape all over them before I buy them.  I just noticed this pattern is listed as “vintage” and if I’d have not cut the pattern pieces out, I could have sold the pattern on eBay for 12 bucks.

9/6/17:  Done.  Still hate it.

20170905_140802.jpg

I Found My Happy Place

I wish I’d taken a picture of the sight. It was a thing of beauty. A quilter’s supply garage sale, in a church gymnasium. A variety of ladies, most into their seventh decade, who have made quilting and crafting their lifelong hobby and career, selling the stuff they don’t need, want or use anymore, the stuff that’s been in bins in their closets and under their sewing tables — scraps, fat quarters, remnants, even some on-the-bolt fabric, buttons, zippers, webbing laid out before me — $1 here to fill a gallon ziptop bag, $3 there for a bag of precut charms. Oh, I get chills just remembering it. It was like Joann’s remnant basket, only hundreds of times better. It was an amateur crafter’s nirvana.

Okay, so I got five yards of awesome denim for $1. I got a bag of really nice precut charms for $3. I found a gallon bag of different colors of webbing for $5. And so much more. I spent $25ish and came out with a pile of dreams that covered my cutting table.

IMG_20170826_213540_602

I may have a problem here, I seem to be collecting fabric like I collect Pinterest pins — so far just great plans and ideas.

Time to get busy.

K.I.S.S.

Meet the insulated casserole carrier

20161105_163309

I saw these handy casserole carriers at the War Eagle Mill fall craft show in Arkansas last year.  This project is so useful and simple — it takes more time picking out cute coordinating fabric than it does to sew it up.  They take maybe an hour to make, if that.

Until you decide to make it not simple.

Here is my first casserole carrier — it’s also the most popular when I show off my work.  I’m not quite sure why pictures of pears is so appealing, but it is.  The inside is yellow gingham.  Simple.  Ones like this one sell at craft shows for $20 or so.

I decided to make a few more of these, and somewhere along the line I decided since I was using a large denim piece, I should quilt my next project to make it extra cute.

This is where the K.I.S.S. rule comes in. What should have been an hour or work at the most , drug on for hours. Hours. And once you start, you’re committed to finish.  It’s a beauty, but with both Insulbright on the inside piece and quilt batting on the outside piece, there’s more cost in materials. The plus side is it’s super heavy duty.  I suppose if you really have a casserole you want to keep warm for a while, this ought to do it.  Oh, and did I say it took hours and hours to quilt?  And three bobbins of thread.  Either I need to get faster at quilting, quilt less, or maybe that’s just not a good idea for this simple project.

This is not how you make money at a craft show, I’m sure. In the end, the carrier still does what the others do, for more cost and way more labor, and probably wouldn’t command the a price equivalent to it’s worth. So, in the future, I will K.I.S.S.

Unless the end result is really cute.  Like quilted denim, which is really, really cute.  

20170827_20283020170827_20201720170827_220245

Maybe a star pattern — six lines that intersect at the center — next time …

Update 9/1/17 – the star pattern:

Jewel Tote Bag

Not really quilting, but some fun with patchwork

Today I pieced a Jewel Bag using instructions from popularpatchwork.com.  The Sweet Sixteen Bag uses 16-5″ charm squares for the outside and 16 more for the lining.  I chose a solid piece of fabric for the lining using the completed outside piece as a pattern, and added a Cam Snap closure.  I used fusible fleece inside rather than quilting it, but this could easily be quilted for a little extra visual effect.

I’ve seen this shape tote called a Jewel Bag, but I’ve seen similar shapes called Hobo Bags or Slouch Bags.  I chose to put a mesh stabilizer in the bottom of my bag to give it shape, and hubby suggested with this shape it looked like a great lunchbox.  He also suggested that with the unusual top of the bag, I could add a little lace, make it look like a bra and call it a Lingerie Bag.  We don’t always listen to him.

I love these denim pieces.  I’ve been repurposing old jeans with blown out backsides or otherwise just too ratty to keep.  I’ve got some great jean fronts saved up to make a couple more aprons on a cold winter day.

Miscellaneous Sewing Stuff

This will be a running post with some miscellaneous projects.

7/2017 – Cross body bag with front pocket for small items, like a phone, pens, notepad, etc.  This one is custom made to the size of whatever tablet you want to put into it.  Mine is for my Asus Transformer with keyboard.  I adapted the Crazy Little Projects Laptop bag.

8/2017 – Silly little sewing project – pumpkin-style pincushion using instructions from CraftyGeminiCreates.  My flat-head quilting pins needed a home and it used up some fabric scraps.

Quilted Patchwork Totes

My newest obsession, the quilted patchwork tote.

My first charm pack tote was kind of a fluke. I like to buy decent-sized fabric remnants at thrift stores, and I found one particularly generous pack of several remnants that when I got it home and unfolded, discovered was actually one large remnant with a stack of pink and purple poorly cut squares. Someone was going to make a little girl’s quilt and stopped after rough-cutting charms. New challenge — make something out of these otherwise useless squares.

My first project was based on a YouTube video tutorial from Missouri Star Quilt Company.  The tote is lined and I added a CamSnap at the center top after these pics were taken.

My second tote was based on Charm Pack Tote Bag Tutorial-Sewn Up from Sewn Up.  This bag was not quilted, but is traditionally lined, so I went ahead and quilted the front, back and bottom panels separately and then sewed them together as I added the inset ruffle.  This one was my new favorite.

While I was creating the mauve tote, I knew I wanted to make a denim patchwork tote. This bag is based on Sewn Up’s Charm Pack Tote Bag with Pocket (I didn’t add the pocket), and I used the Classic Bow Tutorial from Better Homes and Gardens to make the perfect decorative bow.  Again, I quilted my bag, but because the accent ribbon and bow are sewn on after the bag is assembled, I was able to quilt the bag in one large piece.

I’ll definitely be making more of these totes, experimenting with sizes and shapes of the charms.

Update:  Gorgeous greens with diamond quilting.

Update:  Thanks Teresa Mairal, TeresaDownUnder, at Sewn Up Patterns for the nice note back!

Update 8/13:  Here’s a project that was meant to be something else, but I completely screwed it up, so it became this instead.

Don’t Iron Plastic, Kids

How to Clean a Hopeless Iron.

20170630_193930Seems like an obvious statement, I know.  “Don’t iron stuff that will melt.”

But stuff happens sometimes.

So this happened tonight.  My iron tipped for a second at the most, as I was pressing a strap.  Unfortunately, it rested right smack on a thin plastic bag that melted instantaneously.  The plastic fused to the sole plate and was so thin and smooth it was NOT coming off.  I tried ironing waxed paper.  I tried gently scraping, I tried freezing and gently scraping, I tried Magic Erasers, and I tried dryer sheets by themselves.  Nothing budged this stuff.  It was one with the iron.

So here’s the trick – it’s a combo trick.

Waxed paper
Salt
Clean dryer sheets

Turn your iron on the hottest setting.  Put some table salt on a sheet of waxed paper, and on a surface that you won’t damage with a hot iron, iron the salt on the waxed paper.  The salt will cling to the iron, the iron will smoke.  Immediately iron a couple of clean dryer sheets.  You’ll see the melted stuff come off on the dryer sheets.  Repeat until clean.

Fotor_149887707260946